Appearance
FluentCRM Integration
Connecting FluentCart with FluentCRM allows you to create powerful marketing automations based on your customers' actions. When someone makes a purchase, you can automatically add them to specific lists, apply tags, and update their profiles in FluentCRM without lifting a finger.
This guide will walk you through setting up a Global Integration Feed, which runs for every order placed in your store.
FluentCart offers two powerful ways to connect with FluentCRM:
- Global Integrations: These rules apply to every single purchase in your store. They are ideal for general tasks, like adding all new customers to your main newsletter.
- Product Integrations: These rules are more specific and are triggered only when a customer buys a particular item. This is perfect for targeted actions, like adding a customer to a special list after they buy a specific course or e-book.
This guide will focus on setting up a Global Integration.
When to Use Each Integration Type
Before you begin, it's helpful to decide which type of integration best suits your goal:
- Use a Global Integration when: You want an action to apply to every single customer, regardless of what they buy.
- Example: Adding all paying customers to your main "Newsletter" list.
- Use a Product Integration when: You want an action to apply only to customers who buy a specific item. To learn more about setting up these powerful, product-specific automations, please follow our detailed documentation.
- Example: Adding customers who bought your "Advanced SEO Course" to a "Course Students" list and tagging them accordingly.
Enabling the FluentCRM Module
First, you need to make sure the FluentCRM integration module is active.
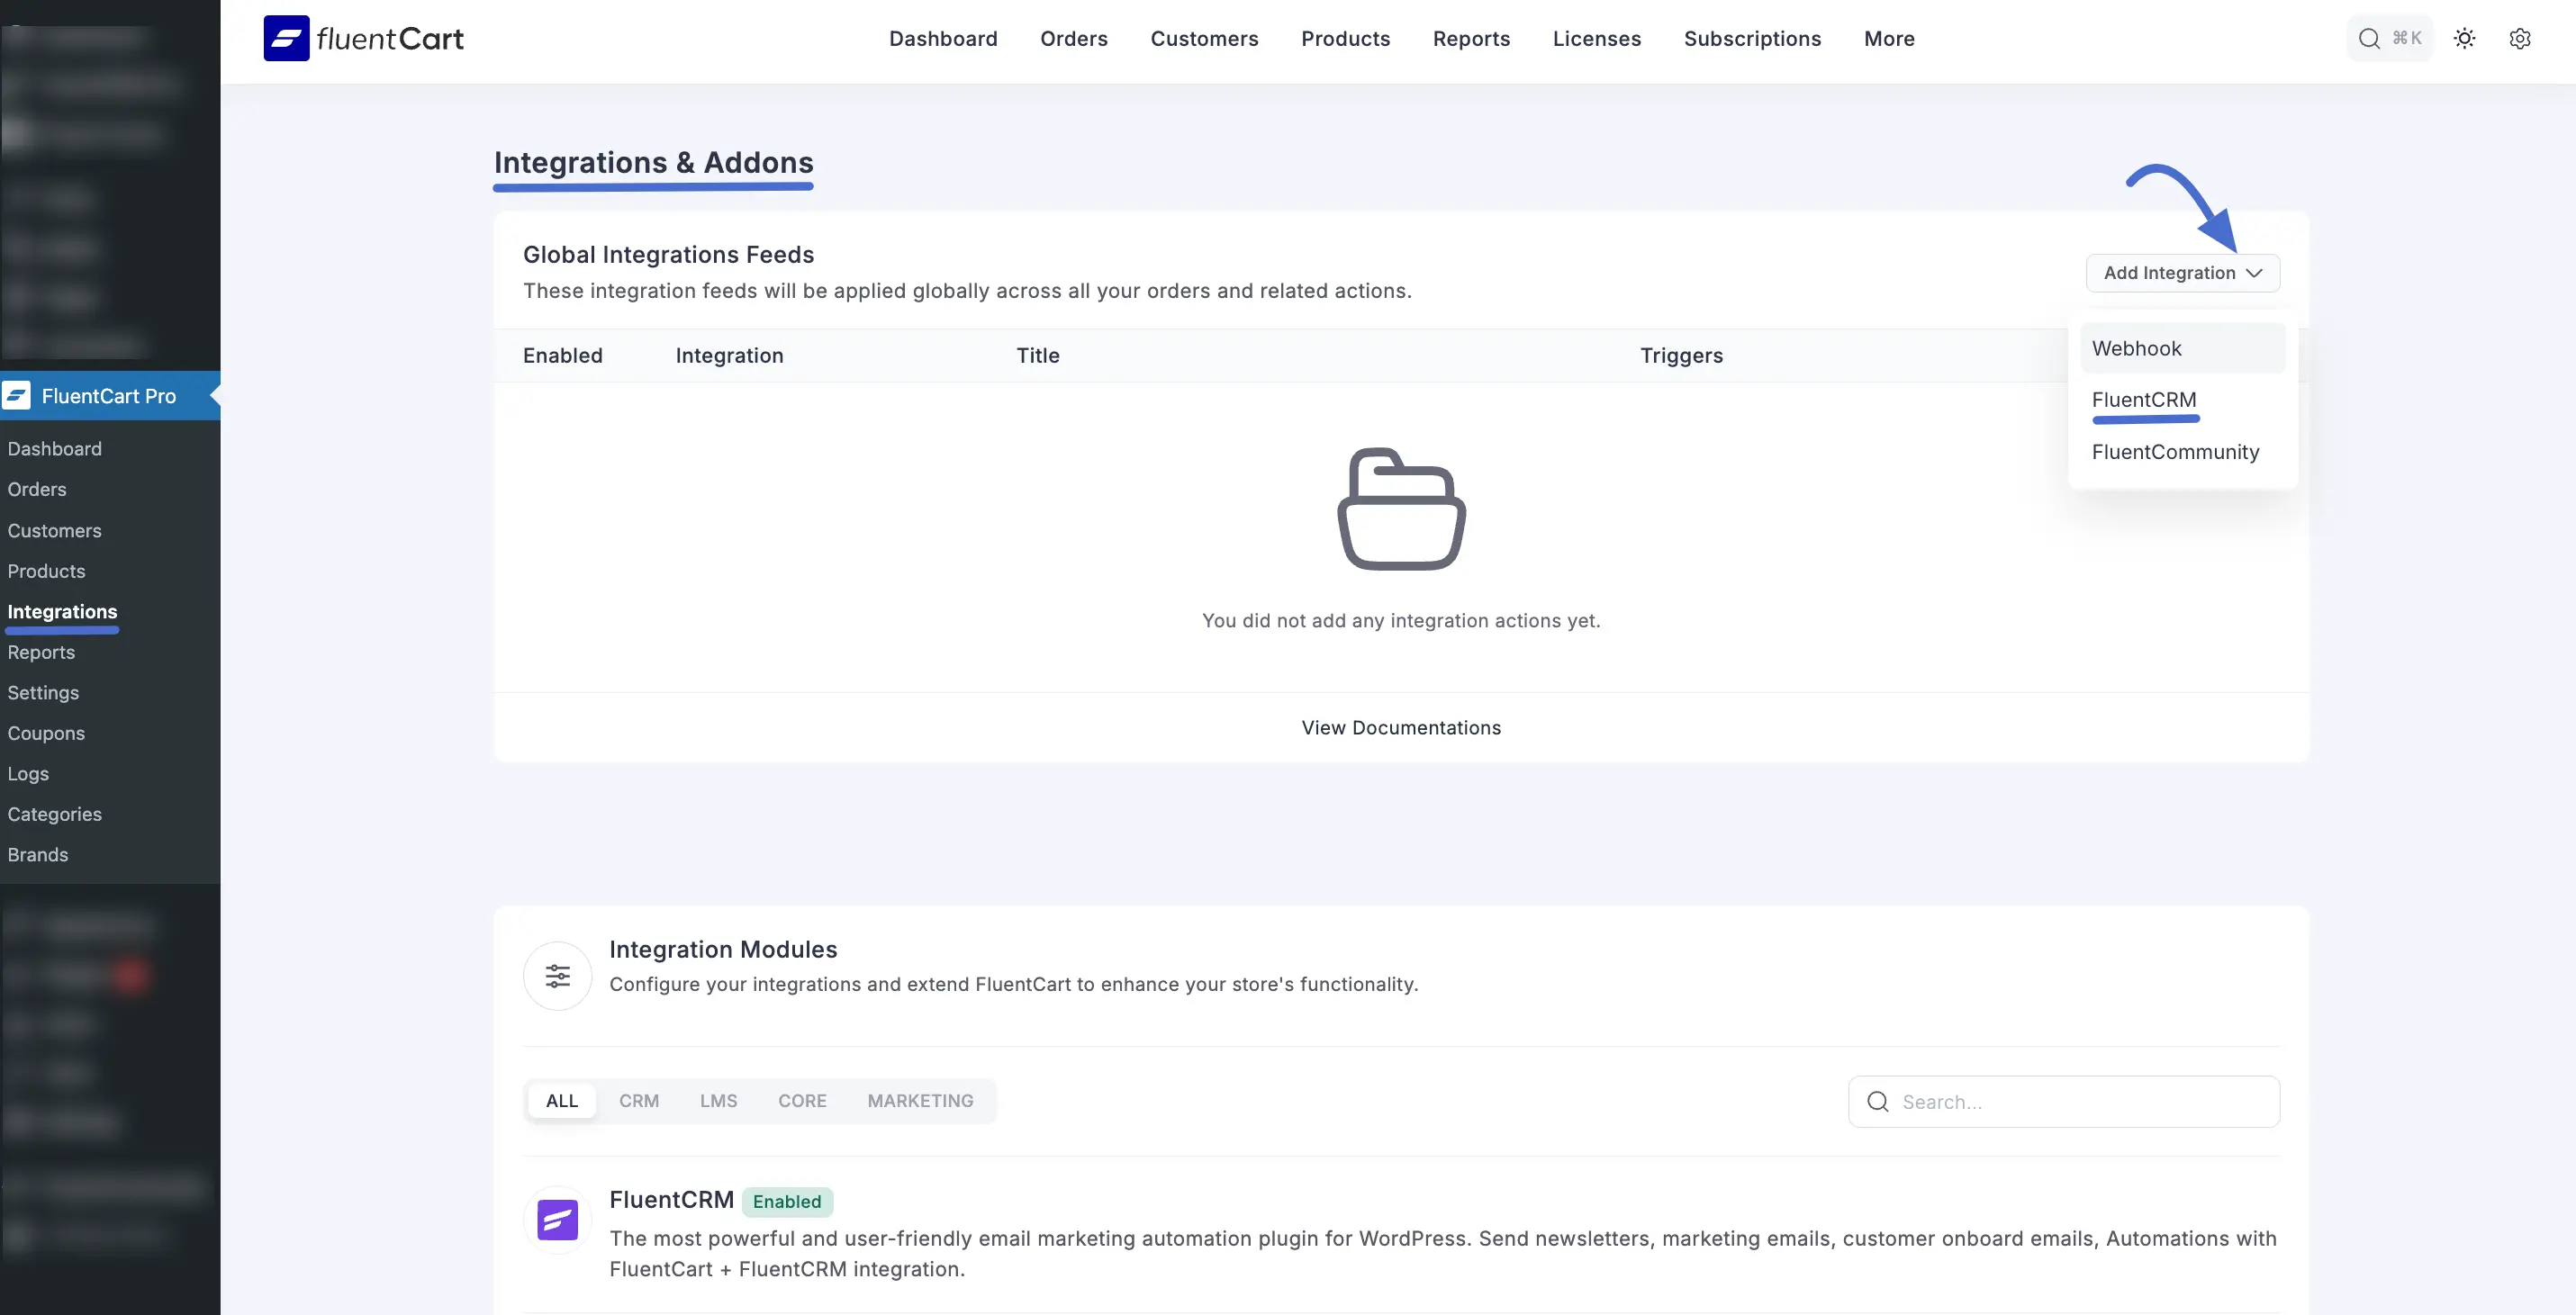
- From your WordPress dashboard, navigate to FluentCart Pro → Integrations.
- Scroll down to the Integration Modules section.
- Find FluentCRM in the list and make sure it is enabled. If it's disabled, you may need to install or activate it first.
Setting Up a Global Integration Feed
A global feed is perfect for tasks that should apply to all your customers, like adding every new buyer to your main newsletter.
Create a New FluentCRM Feed
- Click the Add Integration button in the top-right corner.
- Select FluentCRM from the dropdown menu. This will open a new screen where you can set up the automation rules.

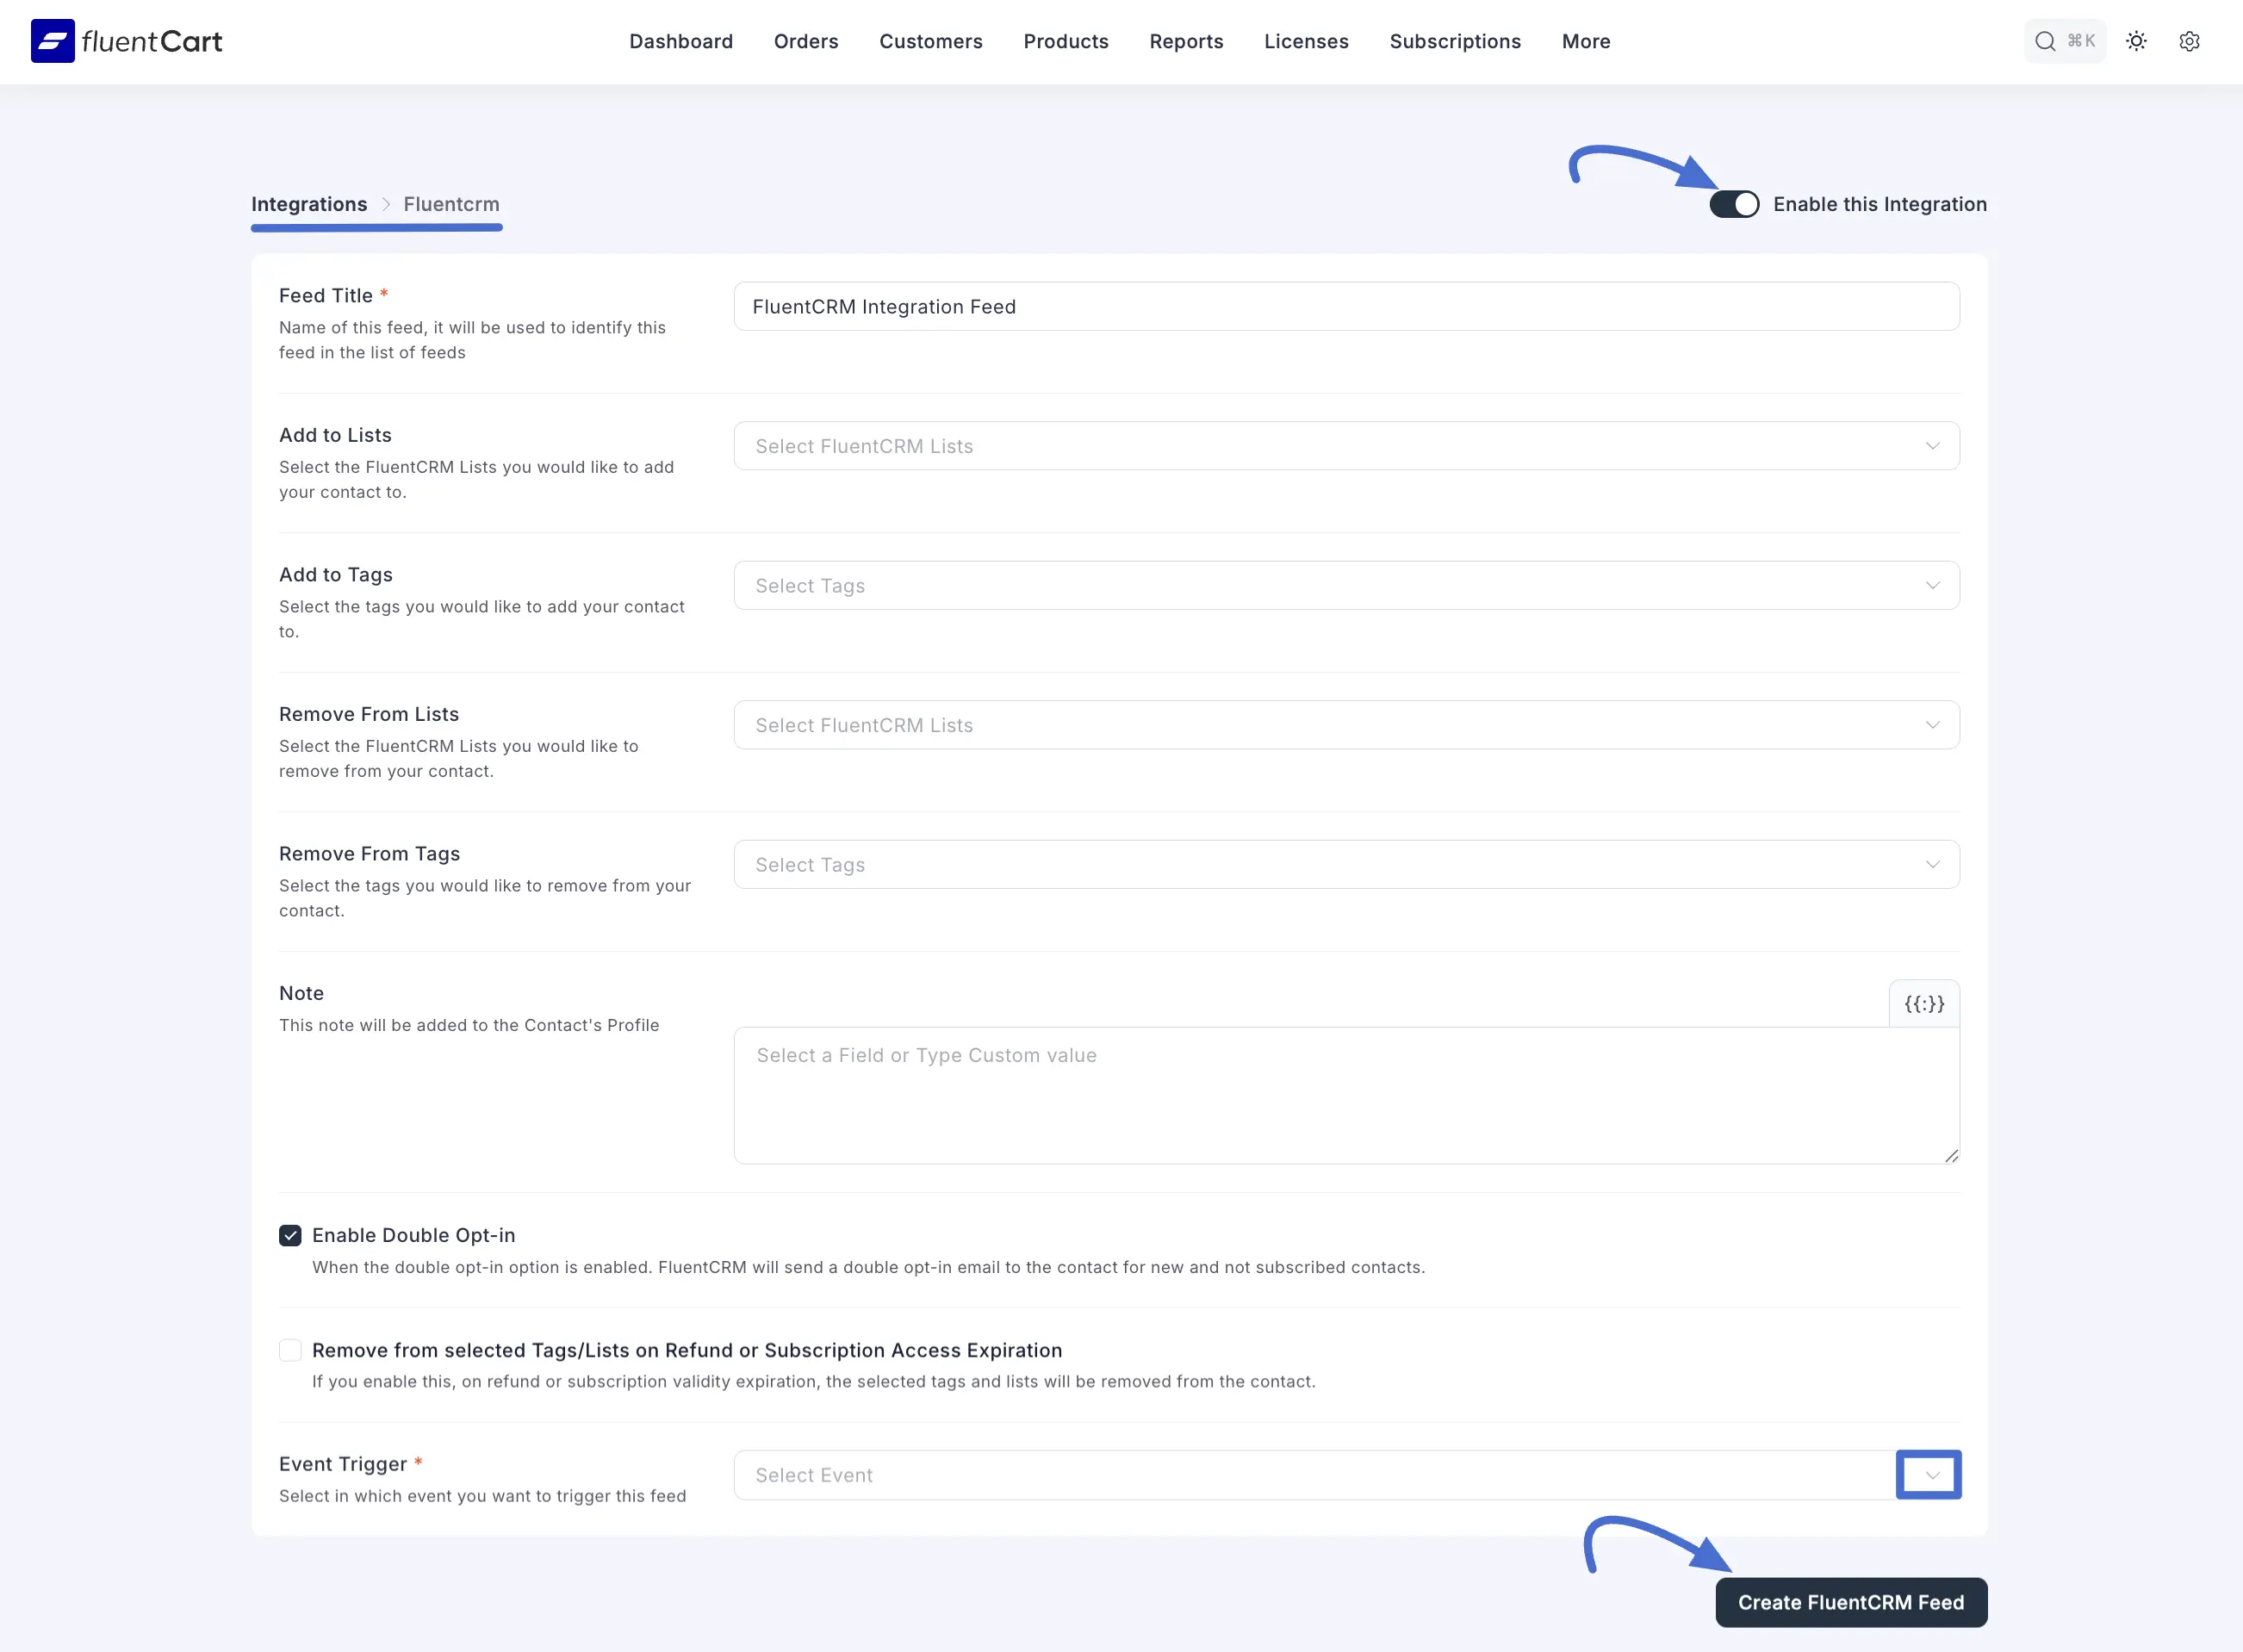
Configure Your Feed
Here, you'll decide exactly what happens in FluentCRM when the feed is triggered.
Feed Title: Give your feed a descriptive name that you'll recognize later, like "Add All Customers to Newsletter.
Add to Lists: Use this field to select the FluentCRM lists you want to add to a customer’s profile when this feed runs from the dropdown.
Add to Tags: Select the FluentCRM tag(s) you want to apply to all new customers. This is a great way to segment all your buyers for future marketing campaigns.
Remove From Lists / Remove From Tags: If needed, you can also select lists and tags to remove from a customer's profile.
Note: You can add a note that will be attached to the contact's profile in FluentCRM. This is great for internal records. You can even make the note dynamic by using shortcodes (click the {(...)} icon) to include customer or order data.
Enable Double Opt-in: It is highly recommended to keep this enabled. It sends a confirmation email to new contacts before they are subscribed, which is a best practice for maintaining a healthy and engaged email list.
Event Trigger: Select the specific store event that will trigger this automation. For most use cases, "Order Completed / Paid" is the best option, as it ensures only paying customers are added to your CRM.
Remove from selected Tags/Lists on Refund or Subscription Access Expiration: This is a handy automation. If you check this box, FluentCart will automatically remove the customer from the lists and tags you selected if their order is refunded or their subscription ends.
Run on Selected Variations Only: This setting allows this integration rule to run only when a customer buys a specific product variation. Select one or more variations from the dropdown to apply this rule exclusively to them. If you leave this field empty, the rule will apply to all variations of this product.
Enable This Integration: Ensure the toggle at the top right is switched on to make the automation active. If it is disabled, the integration will be saved but will not run.

Once configured, click the Create FluentCRM Feed button. This global automation is now live and will run for every order in your store.
Once everything is set up, you can manage the integration by clicking the Edit icon to make changes or the Delete icon to remove it.

Combining Global and Product Integrations
By combining both Global and Product-specific integrations, you can create a sophisticated marketing automation strategy. Use global feeds for general onboarding and product feeds for highly targeted, post-purchase follow-ups that enhance the customer experience.
Advanced Marketing Automation with FluentCRM Triggers
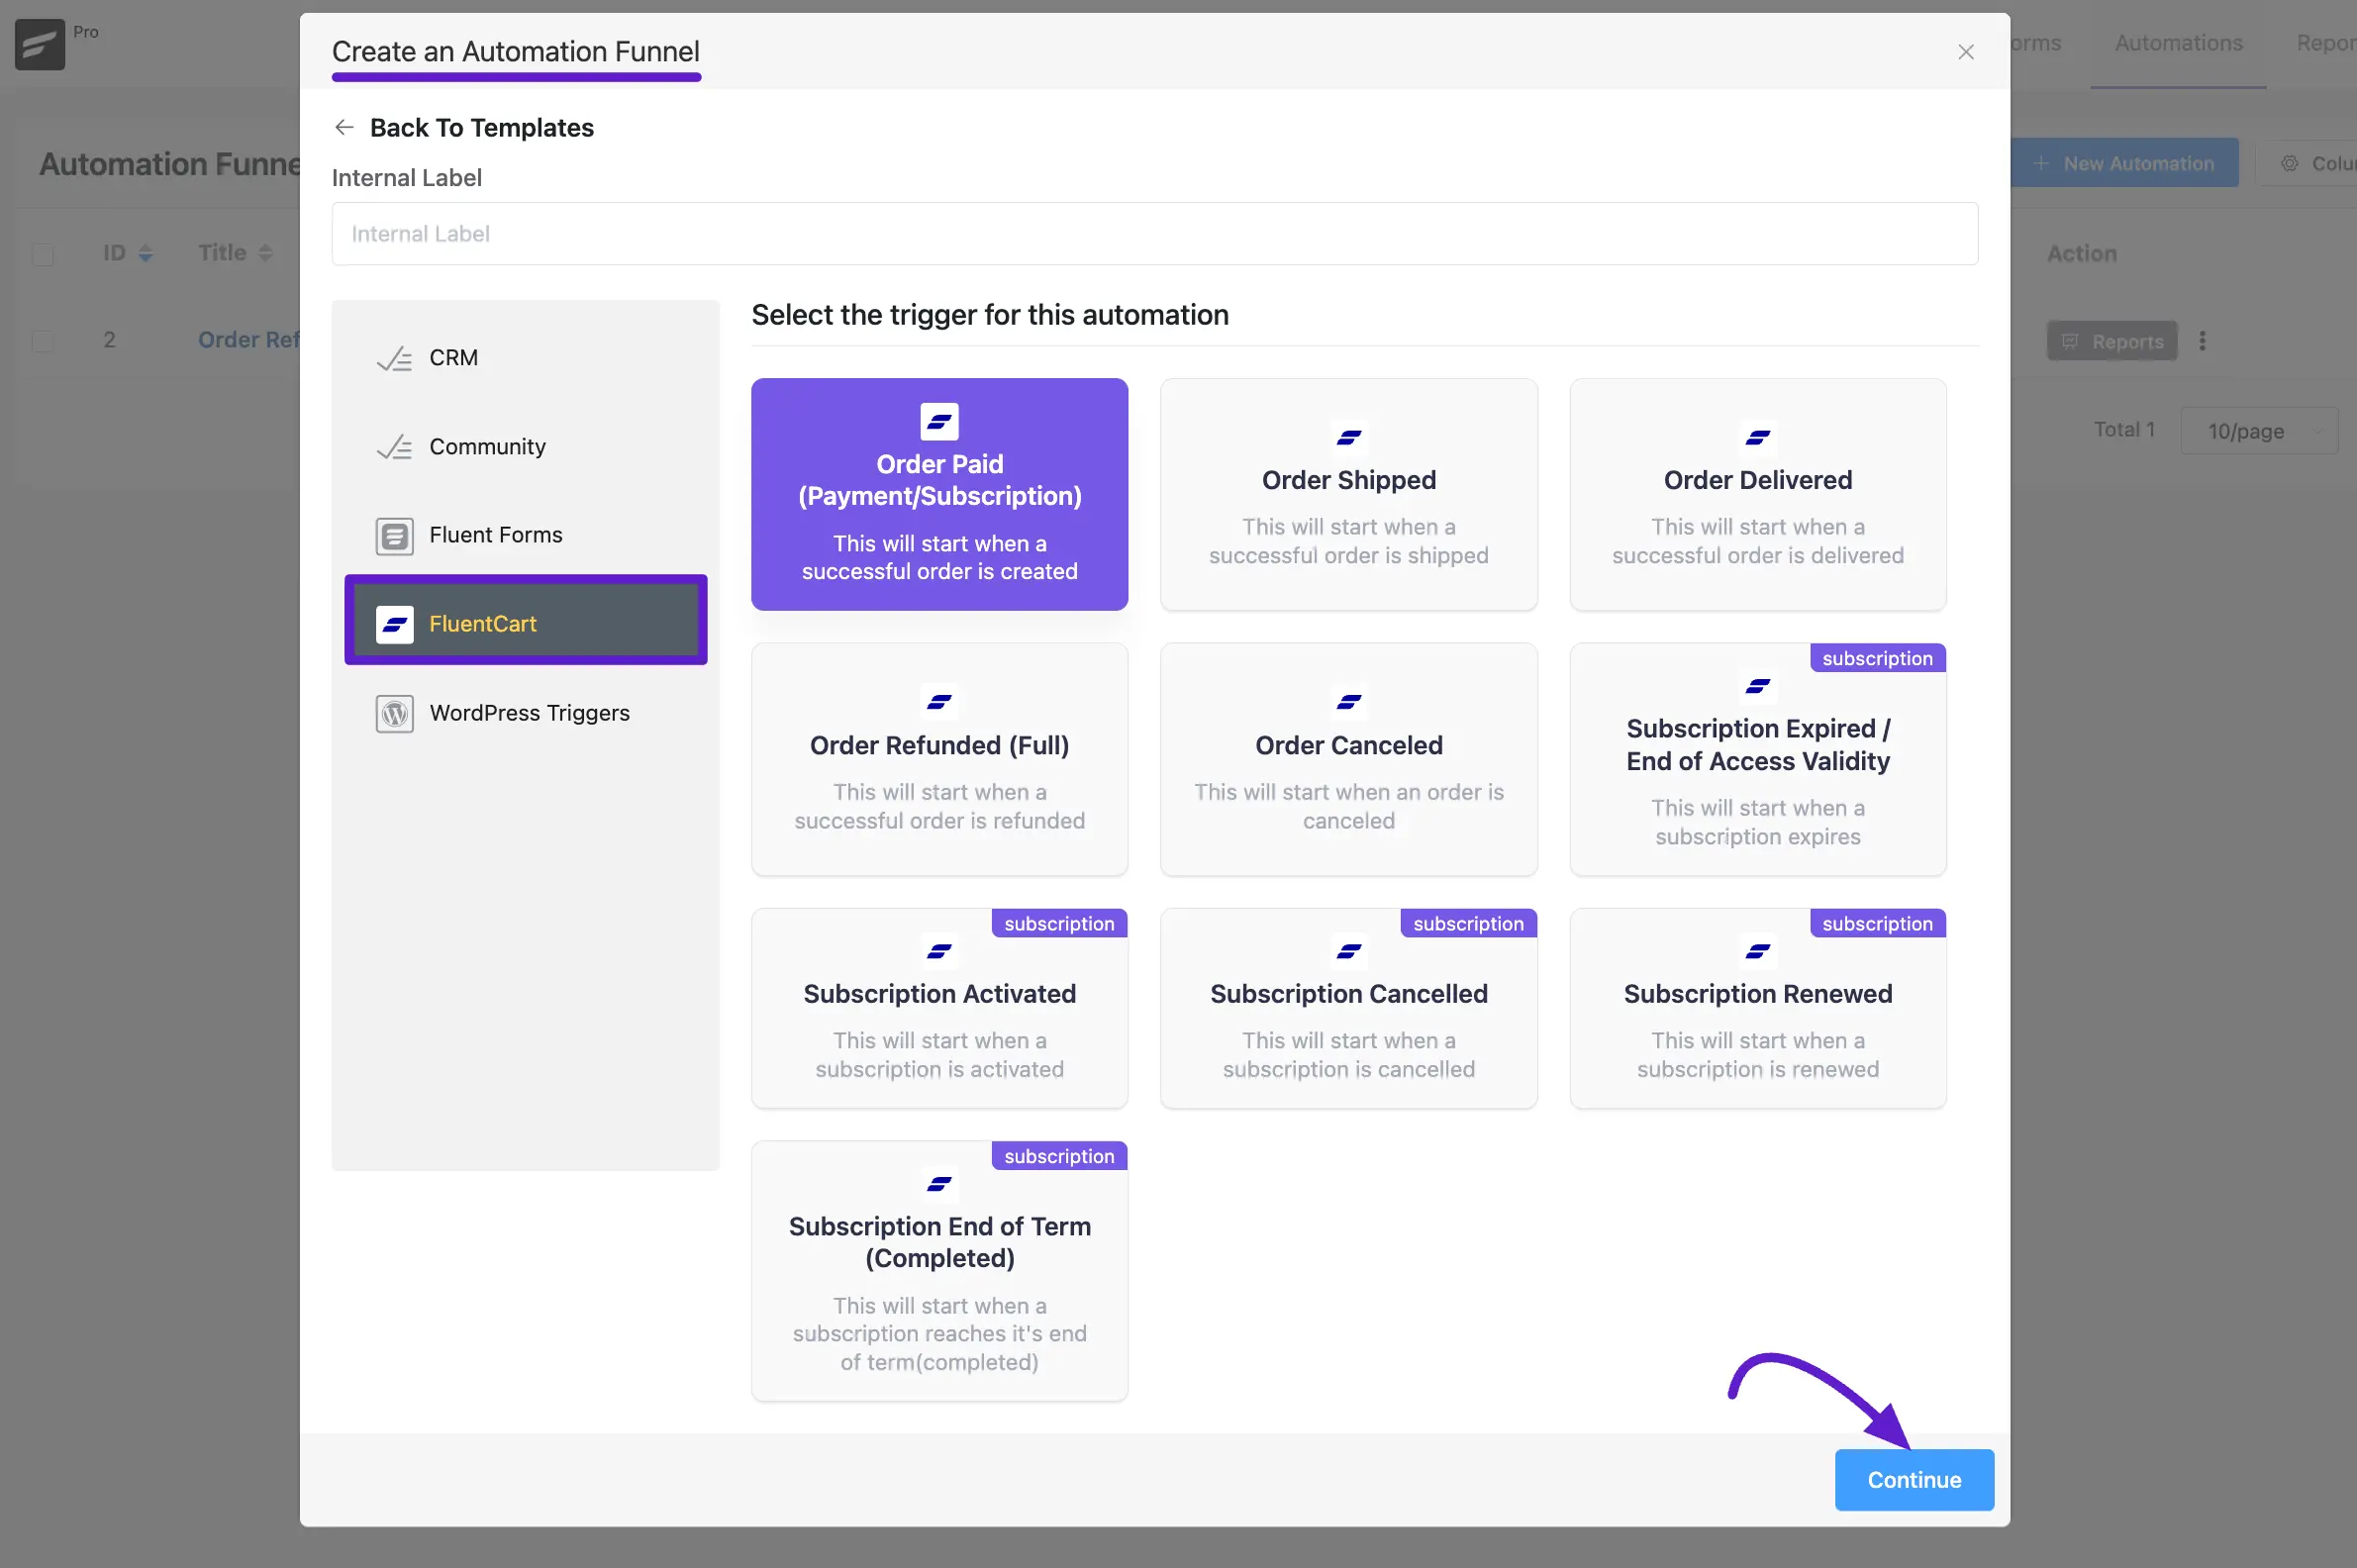
Beyond simply adding tags and lists, the FluentCart integration adds a powerful set of e-commerce triggers directly inside FluentCRM's automation builder. This allows you to create automated marketing funnels based on real-time events in your store. When you create a new automation in FluentCRM, you will find a new FluentCart trigger category. Here are the available triggers and what they do:
When you create a new automation in FluentCRM, you will find a new FluentCart trigger category.
Here are the available triggers and what they do:
- Order Paid (Payment/Subscription): Starts an automation when a new order is successfully paid. Perfect for sending a "Thank You" email or starting an onboarding sequence.
- Order Shipped: Triggers when a physical order's status is changed to "Shipped." Use this to send shipping confirmation emails with tracking information.
- Order Delivered: Triggers when an order's status is changed to "Delivered." A great opportunity to ask for a product review.
- Order Refunded (Full): Starts when a full refund is processed. You could use this to send a survey asking for feedback on why the customer requested a refund.
- Order Canceled: Triggers when an order is canceled.
- Subscription Triggers: A full suite of triggers for managing communication with your subscribers, including Subscription Activated, Subscription Canceled, Subscription Renewed, and Subscription Expired. These are essential for reducing churn and keeping subscribers engaged.
INFO
These triggers are the starting point for powerful marketing funnels. For detailed, step-by-step guides on how to use these triggers to build onboarding sequences, cart abandonment funnels, and other advanced marketing automations, please see this documentation.

Use Case Example: Segmenting Customers by Location
To better understand how this integration works in practice, let's imagine you run an online store that sells physical goods, like custom-printed t-shirts. Your goal is to identify all customers from a specific city (e.g., London) so you can send them a targeted email about a local pop-up shop you are hosting.
Here is how you would configure the FluentCRM feed to achieve this:
- Name:
London Customer Segmentation - List:
Main Customer List - Tags (Dynamic Tag Inputs):
- Tag:
london-customer - Condition: IF
{order.billing.city}equalsLondon.
- Tag:
- Event Trigger:
Order Completed - Status:
Enable This feed
Result:
With this configuration, every time an order with a London billing address is marked as "Completed" in FluentCart, the customer's information will be sent to FluentCRM. They will be added to your "Main Customer List" and will automatically be tagged as london-customer.
Inside FluentCRM, you can then create a new email campaign and, in the recipient settings, choose to send it only to contacts who have the london-customer tag. This ensures your promotional email about the London pop-up shop is sent exclusively to the relevant local audience.
